According to the Internet world start (as of April 2019), just 25% of the total internet users use English. That number speaks volumes.
It indicates a huge potential in expanding your business and reaching up to more people if you have a multilingual website. The benefits of having such a website don’t just stop there, it also helps you increase sales conversion, build branding and trust with cost-effective methods.
The world has been doing this strategy for years, and the demand for multilingual websites is continuing to rise.
Fortunately, Joomla happens to be the CMS that has the most languages supported - 75 up till now. Not just that, to build a multi-language website with Joomla is far easier when compared with other CMS. This feature is shipped in the core of Joomla, so there is no need for any premium extensions to make it work.
Therefore, unless your website is just for local users, there isn’t any reason you should delay the transition to being a multilingual site.
This article will guide you in detail on how to build a multilingual Joomla website in 9 steps.
Yes, there are 9 steps in total.
Although it seems long, it's easy to follow and I will make it as detailed as possible.
So let’s get started.
Step 1: Installing a new language
English is the default language in Joomla, but you can install up to 75 different languages on your Joomla site.
Follow these steps to install a new language:
1. Go to Extensions -> Languages.
2. Click on Install Languages.
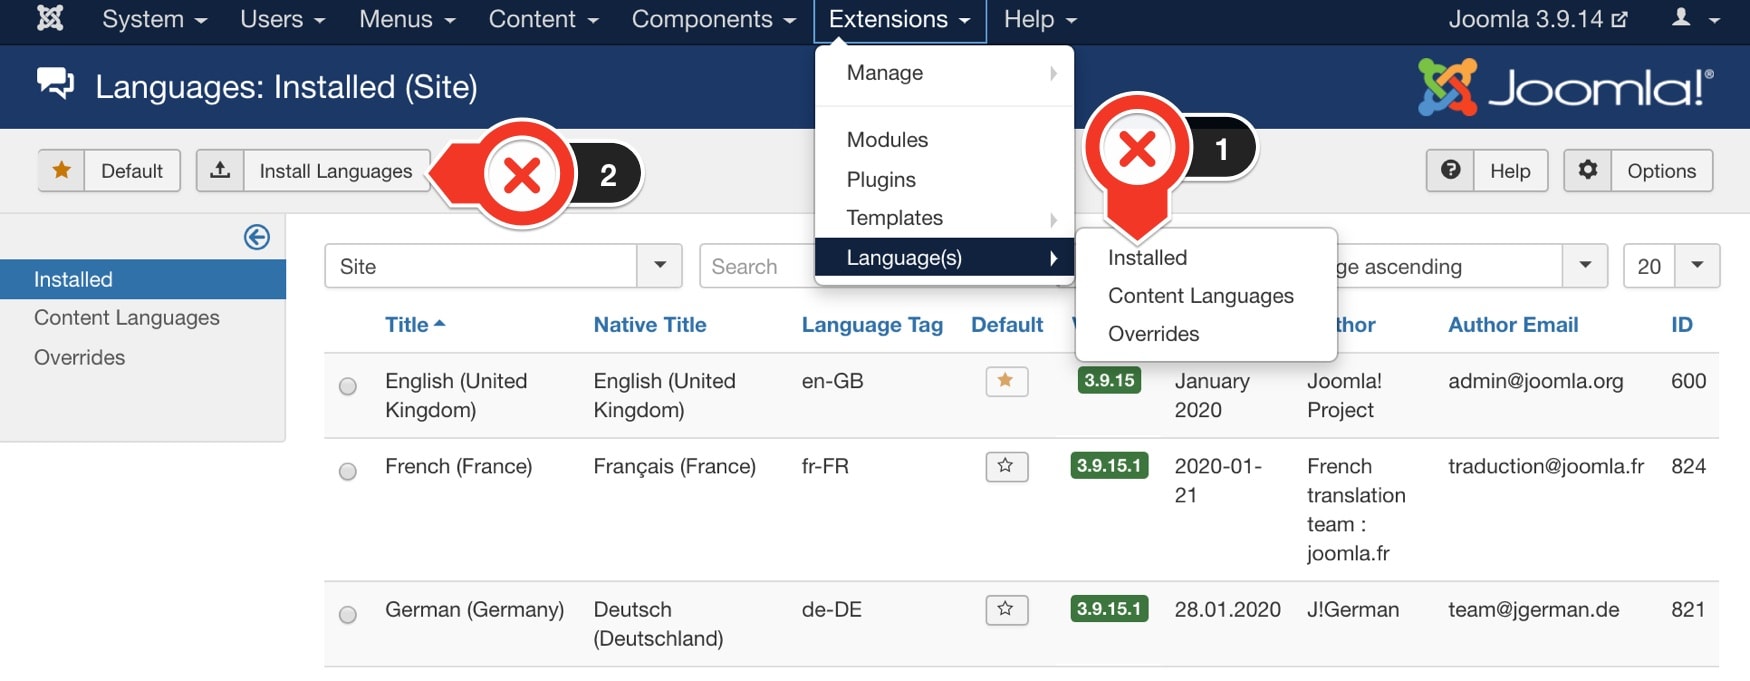
3. Search for the languages you want to install.
If you are unclear what is the meaning of each language tag, you can look up this guide.
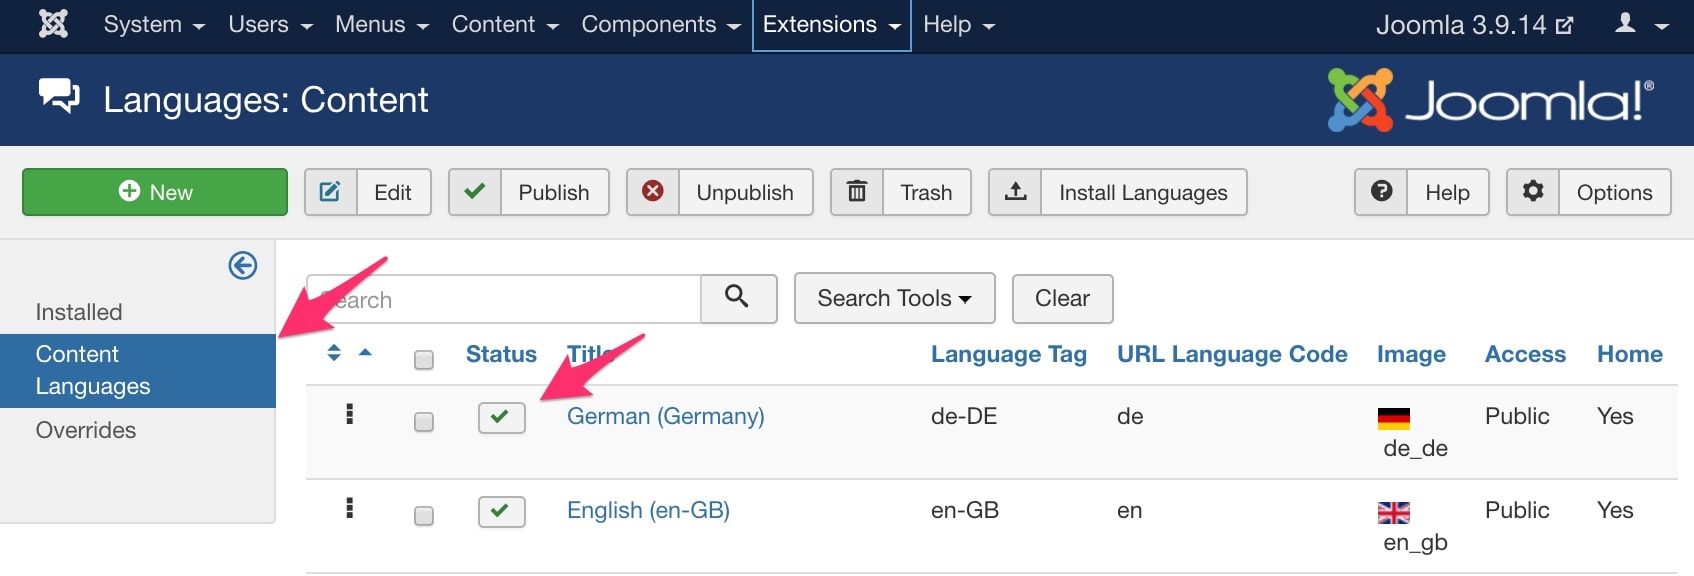
4. After the installation, go to Extensions -> Languages -> Content languages to publish them (by clicking on the “X" icon in the Status column).
For this guide, I installed German as an example.
Note: there is another way to install new languages. You can make the installation during the new Joomla installation process.
Step 2: Enable System - Language plugins
For the next step, you need to enable the “Language” plugins to make this work.
1. Go to Extensions -> Plugin.
2. Put on “Language” in the search bar.
3. Enable 2 plugins: System - Language Filter and System - Language Code.
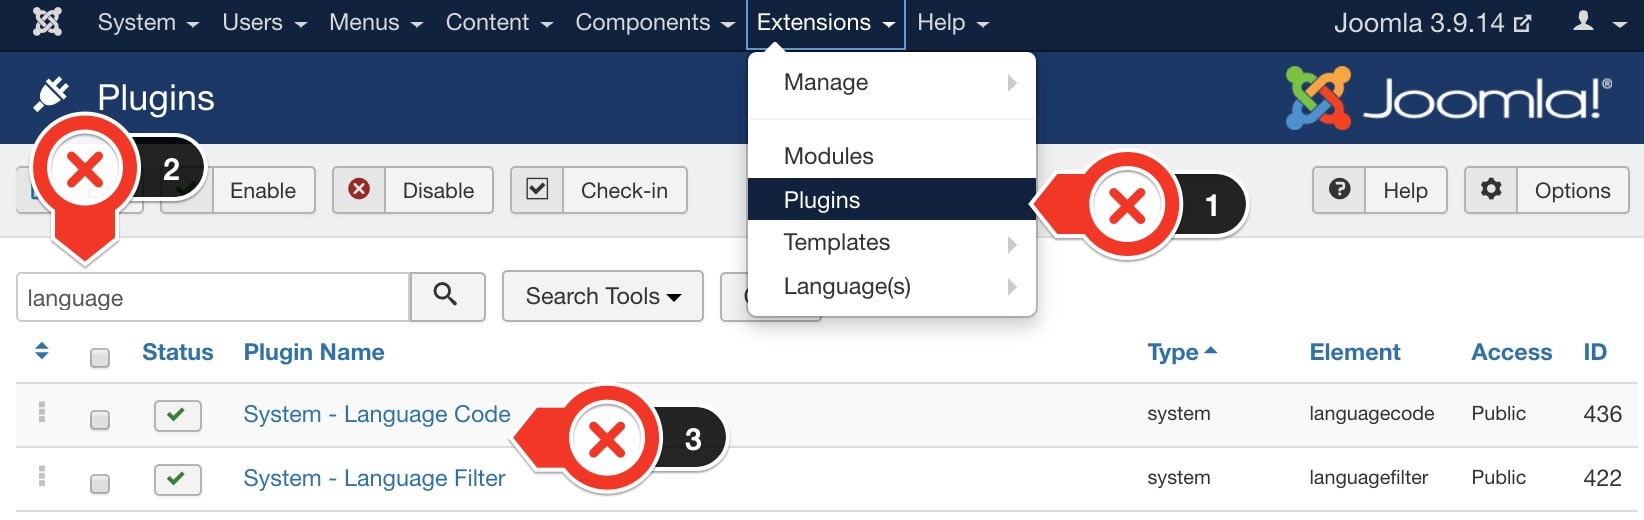
In which:
System - Language Filter is used to filter the displayed content depending on the language. It will reflect on the Association tab that we will talk more in the below section. You can keep the default setting.
System - Language Code provides the ability to change the language code in the generated HTML document to improve SEO. The field will appear when the plugin is enabled and saved.
Step 3: Create multilingual content
Now you have created a website from scratch - or if you need to add multilingual content for an existing website, you can follow these steps:
Create a new category for each language
Create articles in each language
As said, I will use German for the demo.
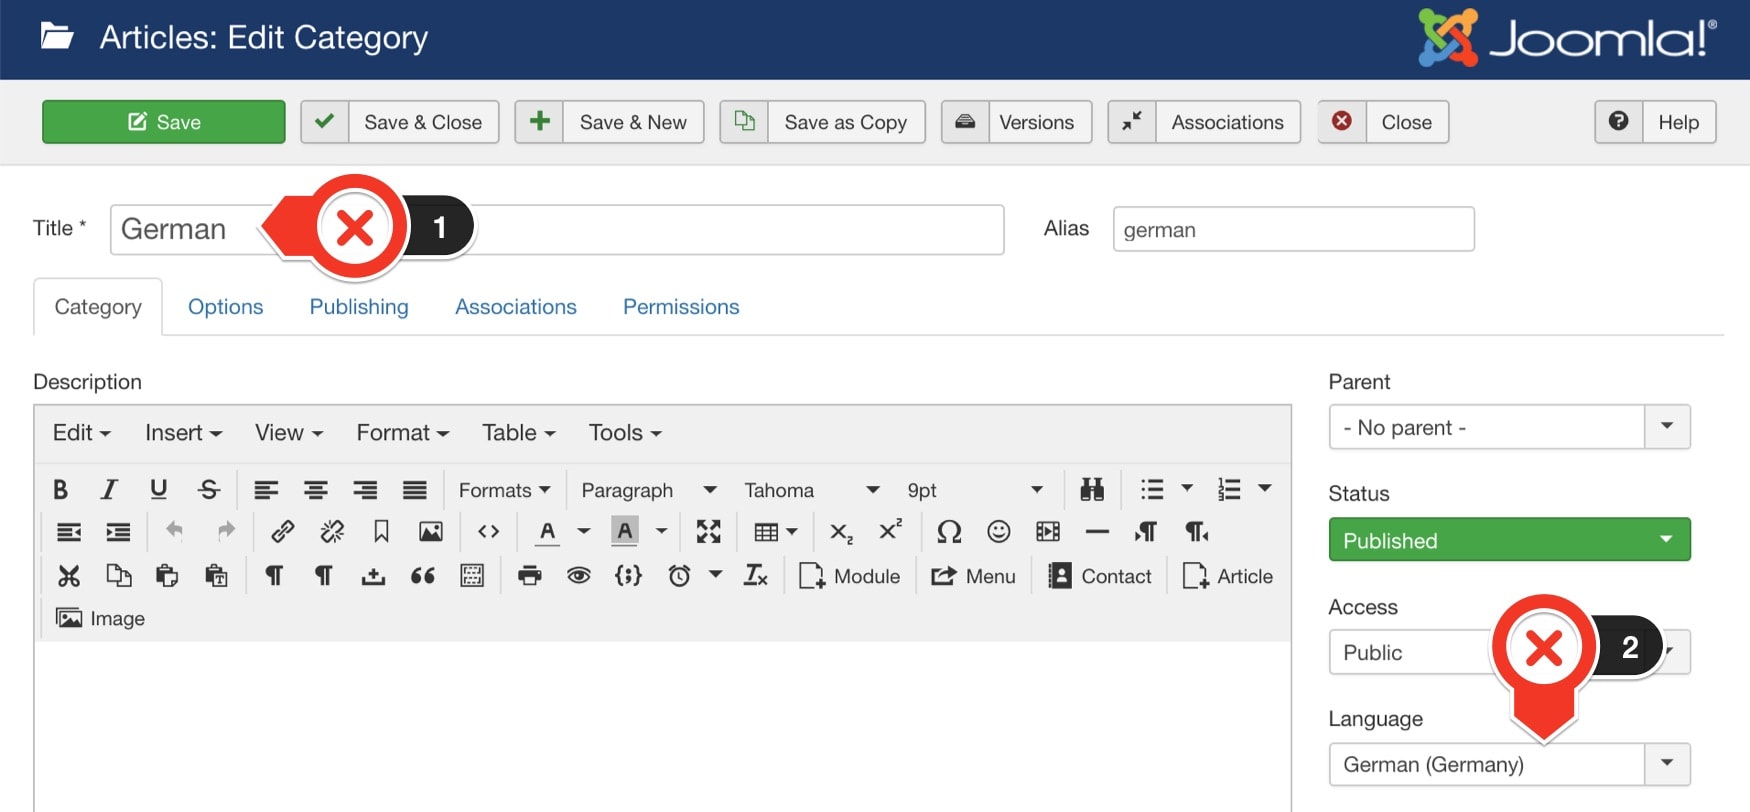
Create new categories
1. Go to Content -> Categories -> Add new Category
2. Make the title after a specific language. In this demo, I put “German” as the category name.
3. In the Language drop-down, change to German.
4. Save & Publish.
Repeat the above steps to create an English content Category.
After these steps, you should have a category for each language:
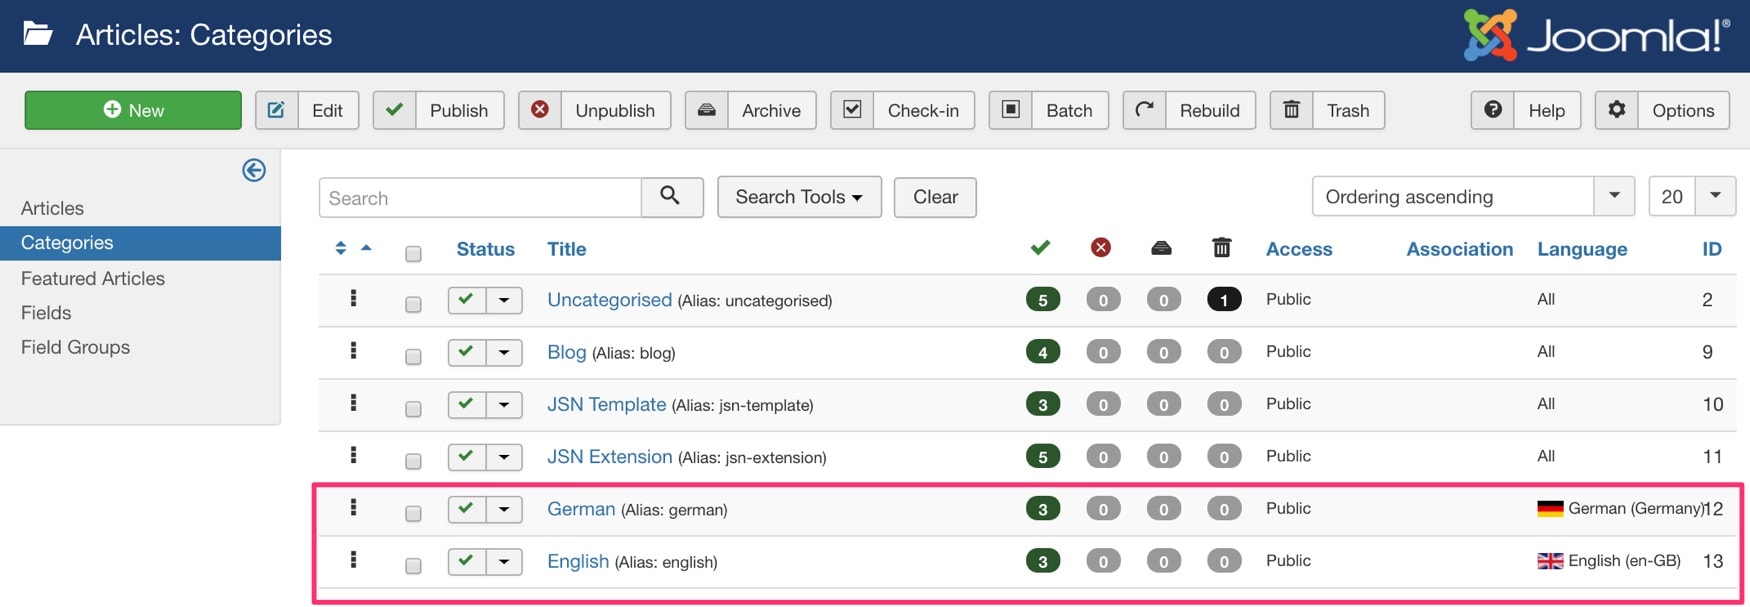
Notes: This step is not compulsory, however, creating a category to manage different language content in your site is an effective method. Especially for a site with hundreds or even thousands of articles.
Create new articles
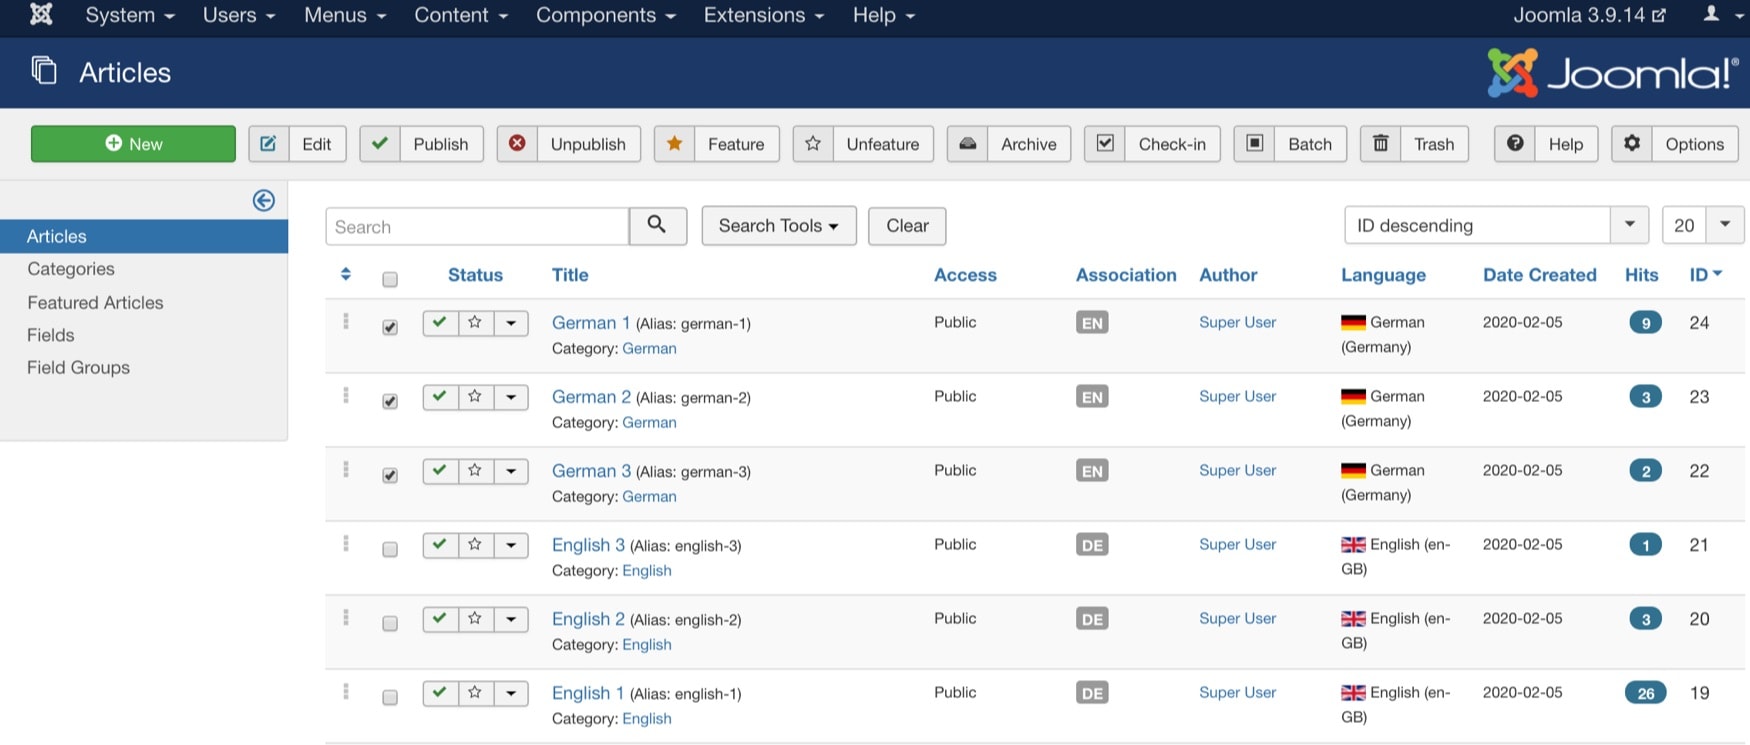
In the next step, you need to create new content for both languages. (English and German). I will create a new article in German as a demo first.
1. Go to Contents -> Articles -> Add new article
2. Put on the Title and Content in German.
3. Choose a suitable category.
4. In the Language drop-down, change to German.
5. Save & Publish.
Repeat the above steps to create as many as needed content both in English and German.
There is a much faster way to create all those articles in a second language (German) without creating them from scratch. By using the Batch button in the toolbar. Here is how you do it:
1. Select all the articles that need to be translated.
2. Click on the Batch button.
3. Change the Set Language to English and choose Copy to a selected category.
In my demo, I have created 3 articles in English and German. The result:
Step 4: Create Multilingual Menus
Categories and articles need to be assigned on the Joomla menu. It’s the first step to get them to display properly on the front-end.
Create new Menus
1. Go to Menus -> Manage -> Add New menu
2. Put on Title and Menu Types
Repeat the above steps for the English menu.
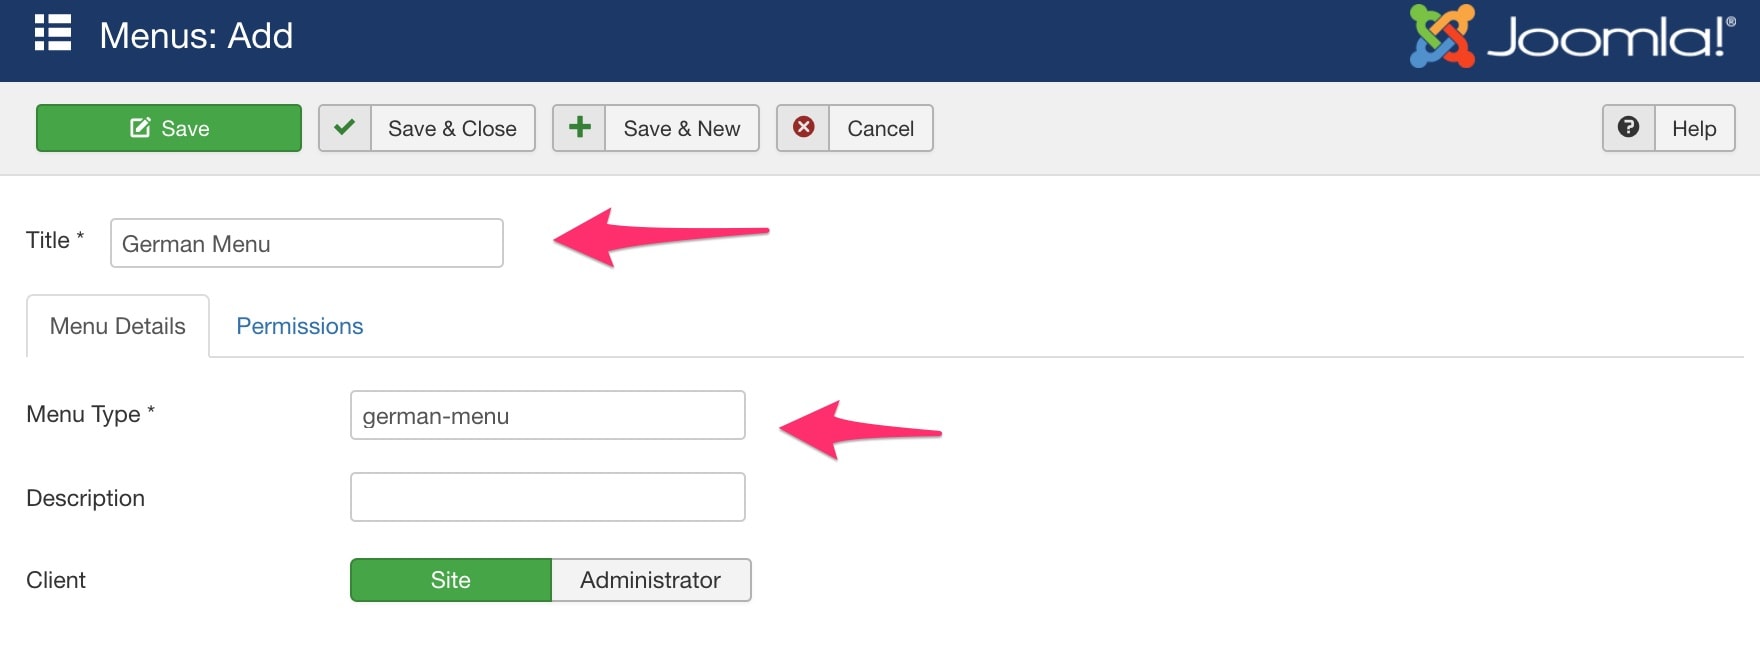
After this step, we will need to have 2 new menus as shown:
Create new Menu items
The menus are still empty, we need to create new menu items for them. For a better demonstration, I will create a menu item with Single Article type for both languages.
1. Go to Menus -> German Menu -> Add New Menu
2. Put on the title and choose Single Article type when selecting Menu Item Types.
3. Choose one of the articles you have created in step 3 when Select an Article to display.
For the demo, I will choose the article named “German 1”
4. In the Language drop-down, change the option to German.
Repeat the above steps for another one menu item under the English menu.
Step 5: Set the default home page for each language
In this step, you have to define the default homepage for each menu. In this guide, we will setup the homepage for the German and English versions.
1. Go to Menu -> German Menu
2. Set the article as a default home page by clicking the star icon.
Do the same with the English menu. This is a crucial step to set up a successful multi-lingual site in Joomla.
Step 6: Display on the front-end
You can display the menu items and its article by using a menu module. I will start with the German menu.
1. Go to Menus -> Manage
2. Click on the Add a module button for this menu to assign a module for the German menu.
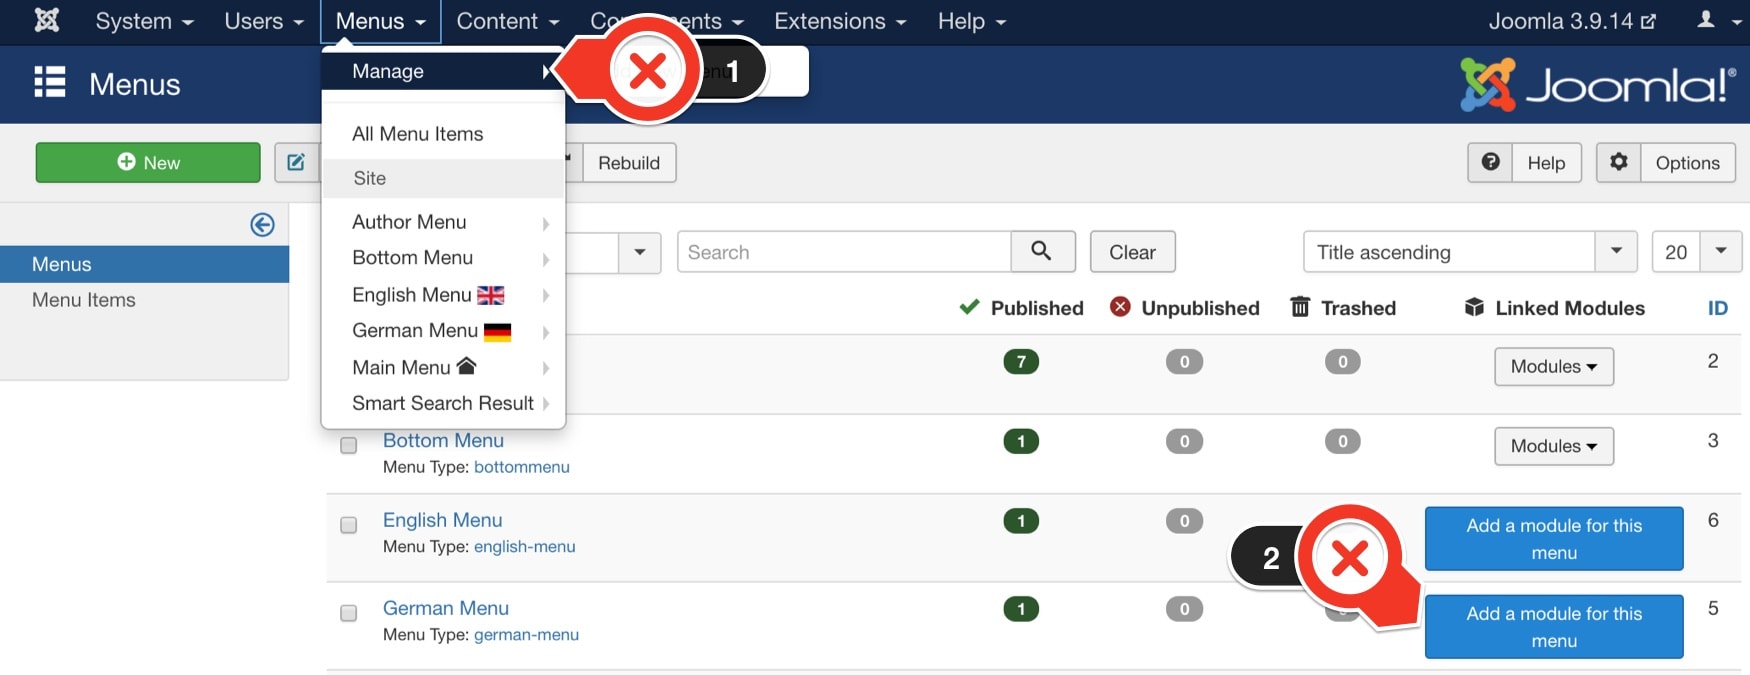
3. On the module setting window, assign your desired position for the module.
In this demo, I choose a position 7 in the Protostar template.
4. In the Language drop-down, change to German or English
5. Save and publish the module.
Repeat the above steps to display the English menu.
Step 7: Make an association between 2 counterpart content
On step 2, you have enabled the required plugin so you can make the association between 2 articles. This feature has been implemented on the CMS since Joomla 3.7.
By making an association between 2 counterpart articles, the CMS can change the content accordingly when you switch the language.
You can make the association on 3 levels:
- Menu
- Category
- Article
We will start with the article level.
In Step 3 and Step 4, we have created articles and menu items for both languages. I will associate those article with each other by following these steps:
1. Go to Content -> Article
2. Click on any article you want to make an association for. I chose “German 1” for this demo.
3. Click on the Association tab.
4. Click on Select, then choose the counterpart article.
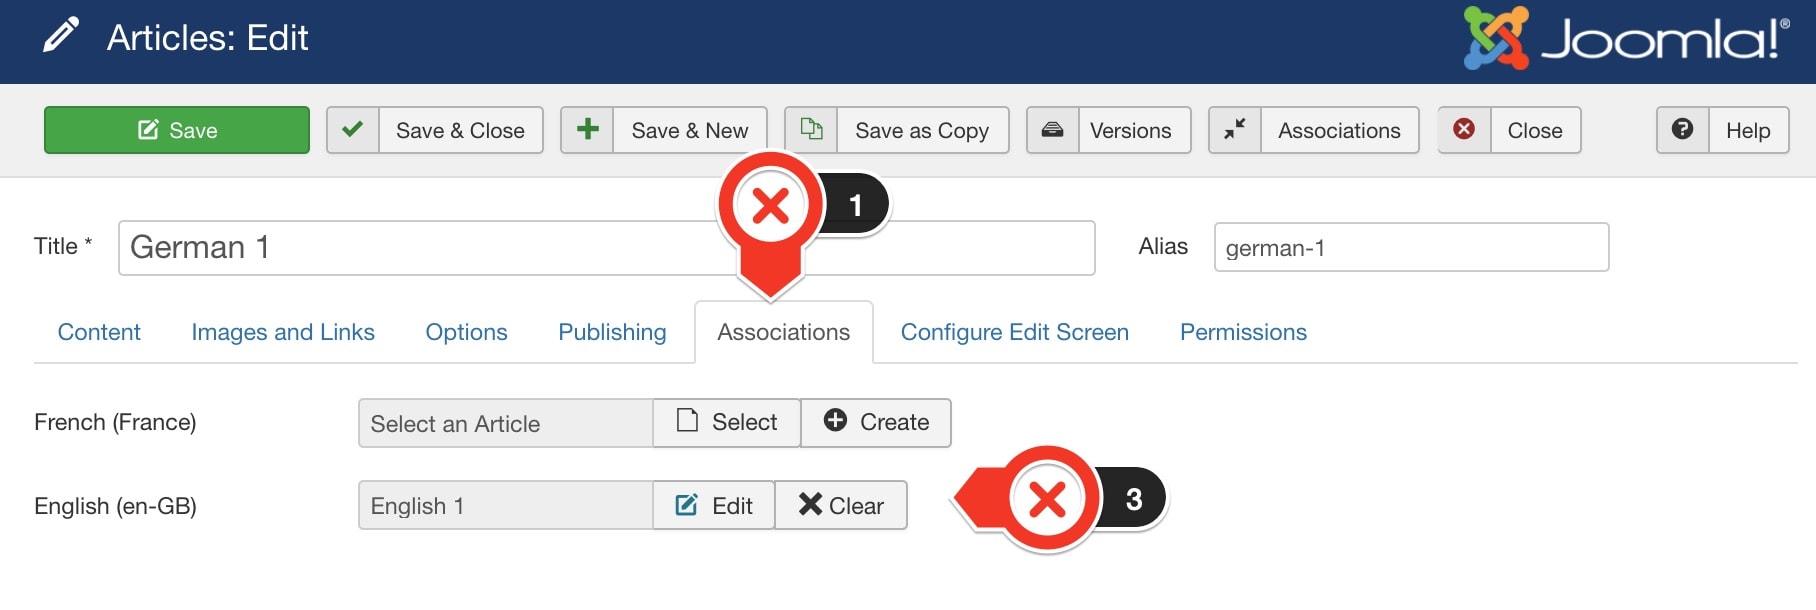
After that, you will notice an EN text on the association column in the article listing page. It indicates that you have associated successfully.
Repeat the above steps with the rest of the articles, menus, and categories.
Another way to make an association between content is that you use the button for Association on the toolbar.
You should use this method when you want to create content in a different language on the flow and don’t want to be mixed up when making the association since it will give you a split-screen, in which the original content is on the right and the desired content is on the left.
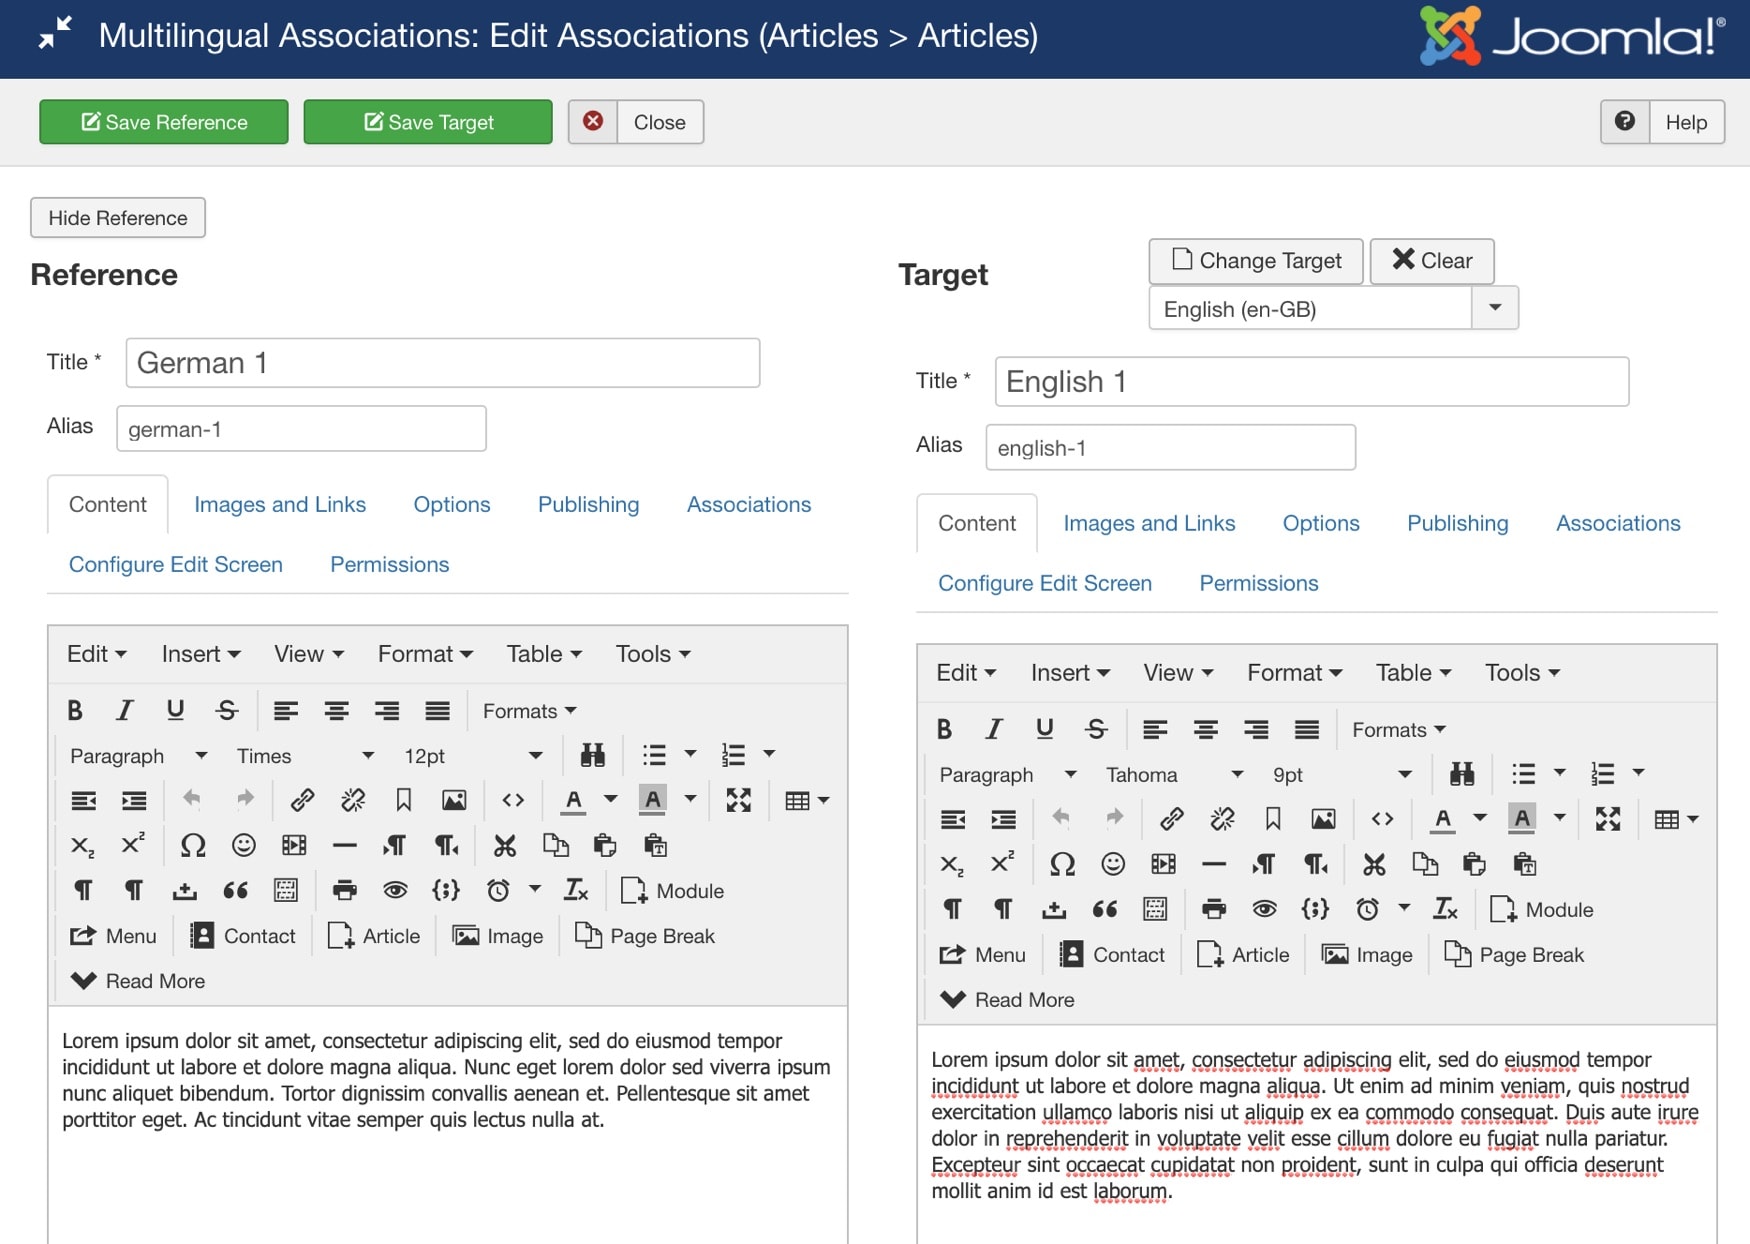
Remember to save when you have finished.
Step 8: Duplicate the template
With each language, there must be a specific template assigned to its content. For this demo, I choose to duplicate the Protostar template. To duplicate the template, you need to:
1. Go to Extensions -> Templates -> Style
2. Choose the Protostar - Default, and click on the Duplicate button.
3. Rename the new template to Protostar - German for better management.
4. Assign the specific content for this duplicate template.
Remember to save after you have finished
Step 9: Create the Language Switcher module
Don’t worry, this is the final step to creating a multilingual Joomla website.
By creating the language switcher module, you have generated a nice and small country flag button on the front-end that acts as the way for the visitor to change the content into their desired language.
1. Go to Extensions -> Modules -> Create New
2. Choose Language Switcher as module type
3. Assign module position for the module.
4. Save and publish
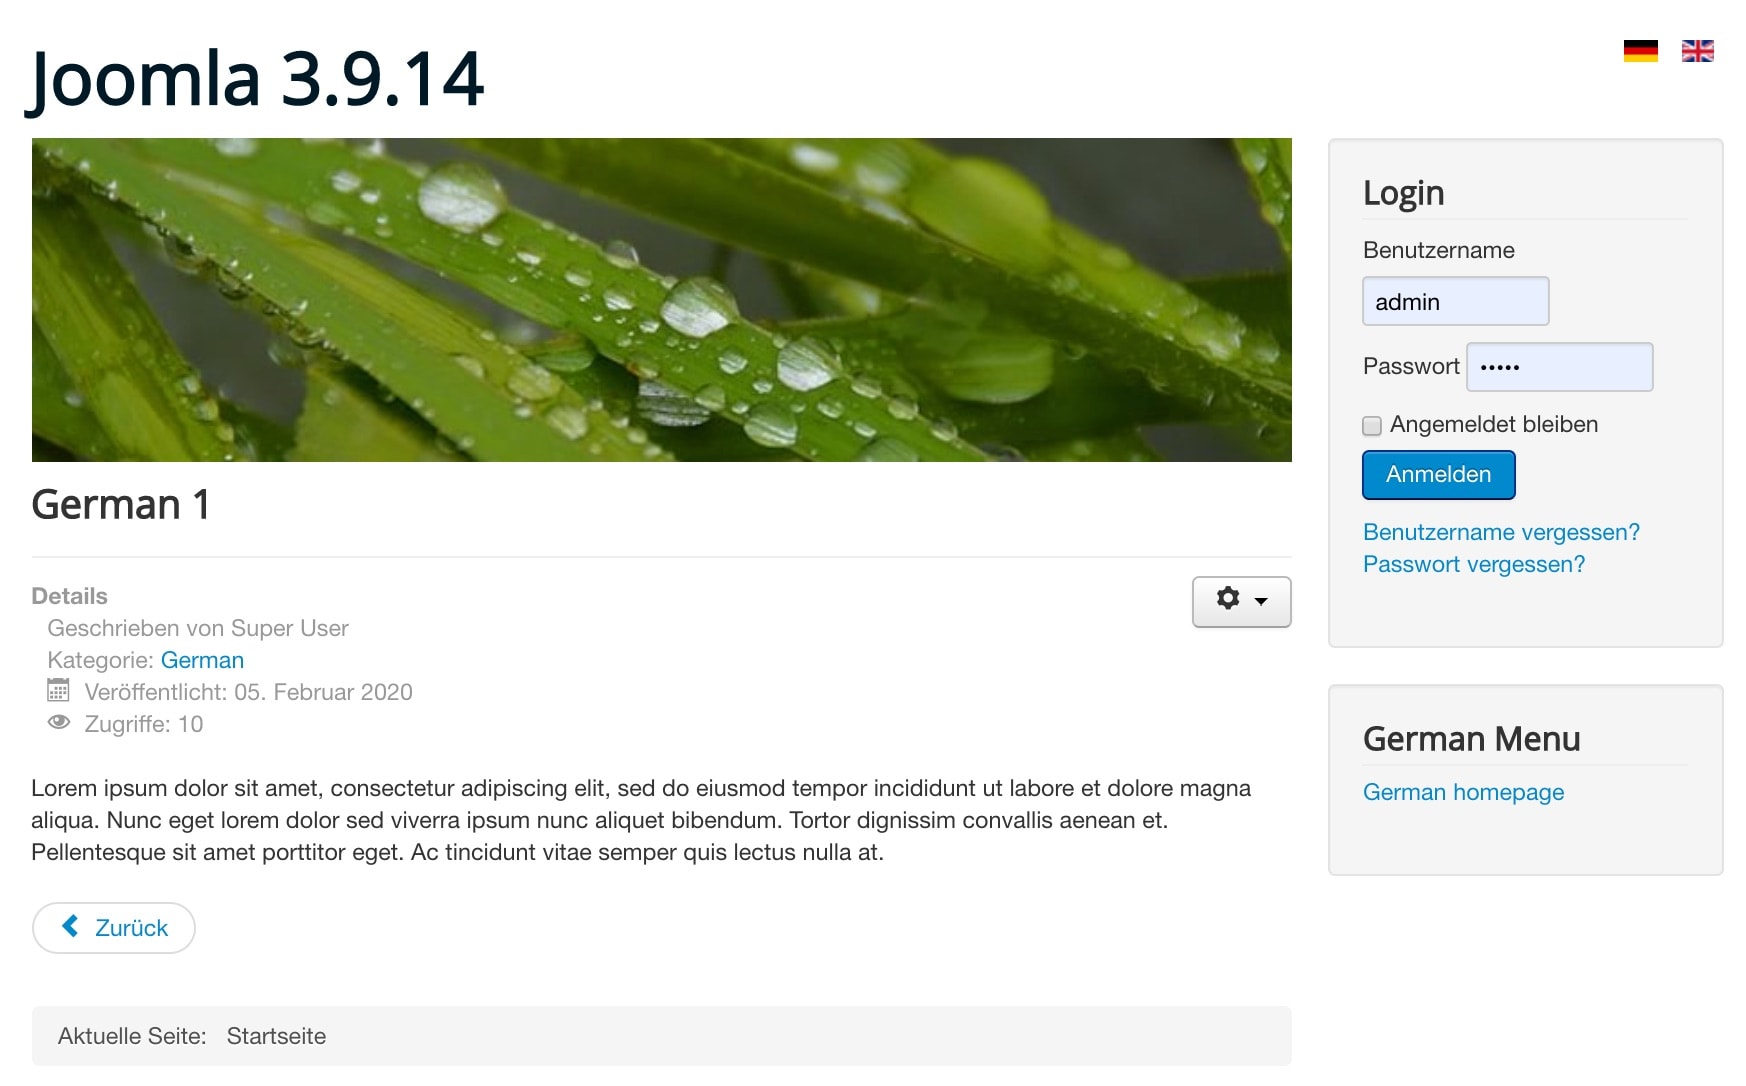
If you configure every step, this is the display you can see in the front-end:
Important notes after setting up
1. When you create a new article, by default, Joomla will set the language as “All”. Your old articles (categories and menus as well) should be set with the specific language instead of “All”. to link the article to other languages.
You can consider running a SQL query to change the settings from the database in case too many articles need to be setup.
2. If you install a new language that contains special characters, you will need to enable Unicode Aliases. In Joomla 3.5 , go to System -> Global Configuration -> Enable Unicode Aliases.
3. If you have a lot of data and it’s very difficult to translate all your content one by one, you should consider using a Joomla multilingual extension such as Falang.
4. You do not have to worry about adding the hreflang tag for Google since when you enable the System - Language filter plugin in step 2, it has taken care of the problem seamlessly.
That’s all!